By Sanidhya Soni | September 05, 2026
Hardening a machine is mostly subtraction. You switch off what you’re not using or don’t need, reducing the attack surface for an adversary.
This guide covers both Linux and Windows.
One thing up front: none of this makes you “compliant” with anything by itself. If you need that, measure against a real baseline — the CIS Benchmarks or a DISA STIG — instead of a checklist some blog threw together. This one included.
What hardening actually means
System hardening is a broad practice. OS hardening is the part of it that deals with the operating system itself: the kernel, the running services, the user accounts, configs that everything else sits on top of. Same idea at every level. Less surface, fewer ways in for an attacker.
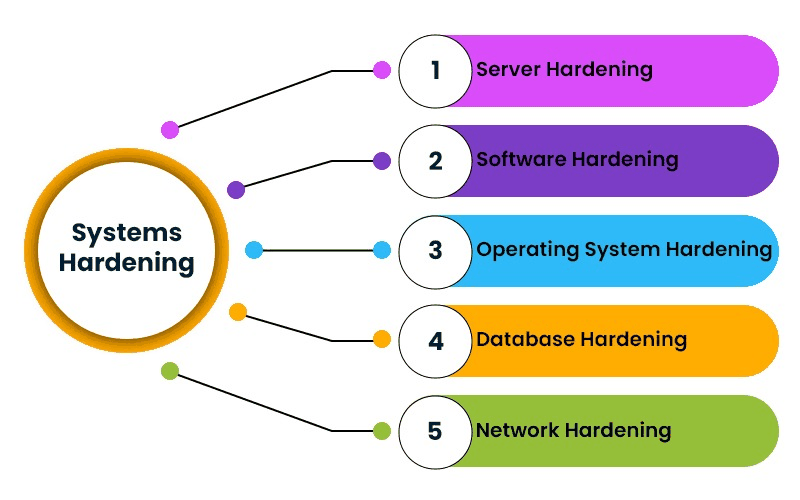
The main categories of system hardening. Source: pynetlabs.com.
Most of the work falls into a handful of buckets:
- Patching
- Cutting unused services
- Tightening accounts and access
- Implementing a host firewall
- Logging
- Backups
The rest of this post explores those buckets individually.
Linux
This is a first pass on a Debian/Ubuntu or RHEL/Fedora box. Where the two families differ, I’ve shown both.
Patch first
Nothing else matters if you’re running month-old packages with public exploits.
sudo apt update && sudo apt upgrade -y      # Debian/Ubuntu
sudo dnf upgrade --refresh                  # RHEL/Fedora (yum on older releases)
Then set up unattended security updates so you’re not relying on memory.
Put up a host firewall
Do this from console access, or over a connection you can afford to lose. One wrong rule and your SSH session is gone.
The painless option on Debian/Ubuntu is ufw:
sudo ufw default deny incoming
sudo ufw default allow outgoing
sudo ufw allow 22/tcp        # SSH — change this if you move the port later
sudo ufw enable
If you’d rather write iptables by hand:
sudo iptables -A INPUT -i lo -j ACCEPT                                       # loopback
sudo iptables -A INPUT -m conntrack --ctstate ESTABLISHED,RELATED -j ACCEPT  # return traffic
sudo iptables -A INPUT -p tcp --dport 22 -j ACCEPT                           # SSH
sudo iptables -A INPUT -j DROP                                               # everything else
iptables rules don’t survive a reboot on their own. Save them with iptables-persistent, or use firewalld on RHEL and let it handle persistence.
Clean up accounts
Lock what nobody uses, rename the obvious defaults, and force stale passwords to rotate.
sudo passwd -l username             # lock an account
sudo usermod -l newname oldname     # rename a default account
sudo passwd --expire username       # force a password change at next login
Keep the sudo group small. Run getent group sudo now and again and ask why each name is there.
Fix file permissions
sudo chmod 400 sensitive_file               # owner read-only, nobody else
sudo chown newuser:newuser sensitive_file   # set owning user and group
chmod 400— owner can read it, nobody else can touch it.chown— reassigns the owning user and group.
Lock down SSH
This is where people lock themselves out, so read this bit twice. Disable root login, switch to keys, and if you like, move off port 22.
Before you turn off password auth, open a second SSH session and confirm your key works. Leave the first one connected until you’ve proven the change.
Set these in /etc/ssh/sshd_config:
PermitRootLogin no
PasswordAuthentication no
Port 2222            # optional: move off the default
Watch out on recent Ubuntu: a file under /etc/ssh/sshd_config.d/ can quietly override the main config. If your change “isn’t working,” that’s usually why. Check there.
Test the config, then restart:
sudo sshd -t                        # catch typos before they bite
sudo systemctl restart ssh          # "ssh" on Debian/Ubuntu, "sshd" on RHEL
Moved the port on a RHEL box with SELinux on? You have to tell SELinux about it first, or sshd won’t bind:
sudo semanage port -a -t ssh_port_t -p tcp 2222
Turn off services you don’t run
Every listening service is another door. See what’s on, then shut what you don’t need.
sudo systemctl list-unit-files --type=service --state=enabled
sudo systemctl disable --now <service_name>
Add fail2ban and auditd
fail2ban bans hosts that hammer your login; auditd records the security events you’ll want after an incident.
sudo apt install fail2ban auditd    # Debian/Ubuntu — the package is "auditd", not "audit"
sudo dnf install fail2ban audit     # RHEL/Fedora — here it's "audit"
That package-name difference trips people up constantly. Copy the wrong line and the install just fails.
Tune the kernel with sysctl
Don’t sed lines that might not exist in /etc/sysctl.conf. On most systemd distros they aren’t there, so the edit does nothing and you never notice. Drop your settings into their own file instead:
sudo tee /etc/sysctl.d/99-hardening.conf > /dev/null <<'EOF'
# SYN cookies — softens SYN floods (usually on already; set it anyway)
net.ipv4.tcp_syncookies = 1

# ignore source-routed packets — kills a class of spoofing
net.ipv4.conf.all.accept_source_route = 0
net.ipv4.conf.default.accept_source_route = 0

# log packets with impossible source addresses ("martians")
net.ipv4.conf.all.log_martians = 1
net.ipv4.conf.default.log_martians = 1
EOF

sudo sysctl --system
Read your logs, and watch your files
sudo journalctl -p err -b           # this boot's errors
sudo aureport --summary             # auditd summary, if it's installed
Then add AIDE. It’s a file-integrity checker: it takes a snapshot of your important files and tells you when one changes behind your back. That’s a different job from a network IDS like Snort or Suricata, which watches traffic. People lump them together; they solve different problems.
sudo apt install aide && sudo aideinit # build the baseline database
Audit on a schedule
Do the review with a tool, not by hand.
sudo lynis audit system
For formal CIS or STIG profiles, reach for OpenSCAP (oscap) with the right SCAP content.
Back it up, and prove it restores
Automating backups is the easy half. The half people skip is testing that they actually come back.
sudo rsync -aAX --delete /source/ /backup/destination/
And stay abreast of advisories for your distro and the software you run. Subscribe to the security list, watch the CVE feeds for anything you actually deploy.
Windows
On Windows most of this is automatable with HardeningKitty. It checks your config against a finding list and can push the recommended settings for you. Better still, it ships lists for Microsoft’s own baselines, the CIS Benchmarks, DoD STIG, and BSI SiSyPHuS, so you’re hardening to a recognised standard instead of a hunch.
Repo: github.com/scipag/HardeningKitty
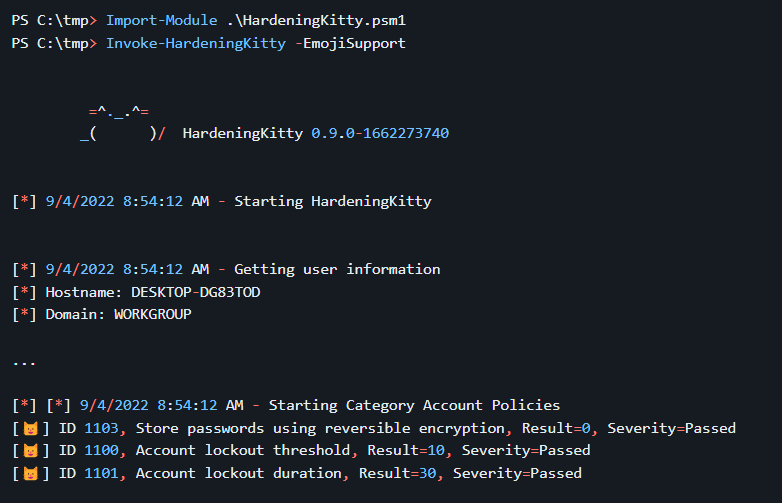
HardeningKitty auditing a Windows box.
Install it
Open PowerShell as Administrator:
Function InstallHardeningKitty() {
    $Version = (((Invoke-WebRequest "https://api.github.com/repos/scipag/HardeningKitty/releases/latest" -UseBasicParsing) | ConvertFrom-Json).Name).SubString(2)
    $HardeningKittyLatestVersionDownloadLink = ((Invoke-WebRequest "https://api.github.com/repos/scipag/HardeningKitty/releases/latest" -UseBasicParsing) | ConvertFrom-Json).zipball_url
    $ProgressPreference = 'SilentlyContinue'
    Invoke-WebRequest $HardeningKittyLatestVersionDownloadLink -Out HardeningKitty$Version.zip
    Expand-Archive -Path ".\HardeningKitty$Version.zip" -Destination ".\HardeningKitty$Version" -Force
    $Folder = Get-ChildItem .\HardeningKitty$Version | Select-Object Name -ExpandProperty Name
    Move-Item ".\HardeningKitty$Version\$Folder\*" ".\HardeningKitty$Version\"
    Remove-Item ".\HardeningKitty$Version\$Folder\"
    New-Item -Path $Env:ProgramFiles\WindowsPowerShell\Modules\HardeningKitty\$Version -ItemType Directory
    Set-Location .\HardeningKitty$Version
    Copy-Item -Path .\HardeningKitty.psd1,.\HardeningKitty.psm1,.\lists\ -Destination $Env:ProgramFiles\WindowsPowerShell\Modules\HardeningKitty\$Version\ -Recurse
    Import-Module "$Env:ProgramFiles\WindowsPowerShell\Modules\HardeningKitty\$Version\HardeningKitty.psm1"
}
InstallHardeningKitty
Reading the score
Each check is weighted by severity: a Passed finding is worth 4 points, Low 2, Medium 1, High 0. The overall number isn’t the raw total, though. It’s normalised onto a 1-to-6 scale:
Score = (points achieved / maximum points) × 5 + 1
So a box that passes everything lands on 6, and one that fails everything bottoms out at 1 rather than 0. It’s a rough gauge you can compare between runs, not a certification.
| Score | Casual | Professional |
|---|---|---|
| 6 | 😹 Excellent | Excellent |
| 5 | 😺 Well done | Good |
| 4 | 😼 Sufficient | Sufficient |
| 3 | 😿 Could be better | Insufficient |
| 2 | 🙀 Weak | Insufficient |
| 1 | 😾 Bogus | Insufficient |
The modes worth knowing
Audit is the default. It reads your current settings, compares them to the list, and writes CSV and log reports. Nothing changes on the system.
Invoke-HardeningKitty -Mode Audit -Log -Report
Point it at a specific list when you want to audit against, say, a CIS profile:
Invoke-HardeningKitty -FileFindingList .\lists\finding_list_0x6d69636b_user.csv -SkipMachineInformation
Filter by severity to look at one class of finding:
Invoke-HardeningKitty -Filter { $_.Severity -eq "Medium" }
Config mode just dumps your current settings, no comparison. Handy as a snapshot before you change anything:
Invoke-HardeningKitty -Mode Config -Report -ReportFile C:\tmp\hardeningkitty_config.csv
Backup saves your current state as a finding list you can roll back to:
Invoke-HardeningKitty -Mode Config -Backup -BackupFile ".\myBackup.csv" -FileFindingList ".\lists\{list}.csv"
HailMary is the one that actually changes things. It applies a finding list, setting everything to the recommended value. It’s destructive, so take a Backup first — restoring is just HailMary pointed back at your backup file.
# apply a hardening list
Invoke-HardeningKitty -Mode HailMary -Log -Report -FileFindingList .\lists\finding_list_0x6d69636b_machine.csv

# roll back to your snapshot
Invoke-HardeningKitty -Mode HailMary -Log -Report -FileFindingList .\myBackup.csv
There’s also an experimental GPO mode that turns a finding list into a Group Policy object. It needs the Group Policy Management module, and it won’t touch anything until you link the policy to something.
Invoke-HardeningKitty -Mode GPO -FileFindingList .\lists\finding_list_0x6d69636b_machine.csv -GPOName "HardeningKitty"
Short on time?
These five buy you the most safety for the least effort:
- Patch fully, then turn on automatic security updates.
- Put up the host firewall with default-deny inbound.
- Move SSH to keys only, no root login — after you’ve tested the key.
- Trim the admin group and require MFA on anything privileged.
- Turn on logging, and keep a backup you’ve actually restored from once.
Everything else builds on those. And none of it is one-and-done. Every package you add and every config you change can reopen something you’d closed, so re-run Lynis or HardeningKitty every so often and see what drifted.
References
- OS Hardening — 10 Best Practices — Perception Point
- System Hardening — RedSwitches
- Your First 5 Steps in Linux Server Hardening — CalCom
- Linux Hardening: Secure Server Checklist — Pluralsight
- CIS Benchmarks — Center for Internet Security
- DISA STIGs — DoD Cyber Exchange
- HardeningKitty — scip AG